Nord VPN jedan je od starih igrača u svijetu VPN-a i njegova Windows aplikacija smatra se jednom od najboljih u svijetu računala. Nord VPN vrlo je raznolik ako se govori u smislu funkcionalnosti i fleksibilnosti. Osim podrške na više platformi, ima i različite poslužitelje smještene u različitim zemljama između kojih možete odabrati.

Unatoč tome što je aplikacija na tržištu prilično dugo, korisnici izvještavaju da se ne mogu povezati s Nord VPN-om. Prestaje se povezivati nakon potencijalnog ažuriranja ili zahtjev za DNS poslužitelje vraća odgovor "isteklo vrijeme".
Što uzrokuje da se Nord VPN ne poveže?
Budući da VPN koristi cjelokupnu internetsku arhitekturu računalnog sustava, postoji nekoliko razloga zašto se vaš Nord VPN možda neće moći pravilno povezati. Neki od njih navedeni su u nastavku.
- IPv6: Očito Nord VPN ne podržava protokol IPv6 ni u jednoj od svojih komunikacija. Dakle, ako je ovo omogućeno, možda se nećete moći povezati.
- Programi trećih strana: Poznato je da se programi trećih strana sukobljavaju sa softverskim sustavom i natječu se za resurse; dakle, uzrokujući da se ne poveže pravilno.
- Mrežni adapter: Budući da Nord koristi zasebni mrežni adapter za komunikaciju s internetom, može biti tako da mrežni adapter ne radi ispravno i da ga morate ponovno pokrenuti.
- Pogreška u mreži: Ponekad su mrežne konfiguracije na vašem računalu u stanju pogreške što uopće ne dovodi do povezivanja. U ovom slučaju možemo pokušati osvježiti sve varijable.
Prije nego što započnemo s rješenjima, morate se uvjeriti da vaš internet stvarno radi . Ako vaš internet ne radi kako treba, Nord neće moći uspostaviti odgovarajuću vezu i omogućiti vam pristup tuneliranoj mreži.
Obavezno koristite privatnu mrežu (ne školu, posao ili javna mjesta poput bolnica) i da nisu uključeni nikakvi posrednici. Nakon što ste još jednom provjerili radi li vaš internet u redu, nastavite.
1. rješenje: Onemogućavanje IPv6
IPv6 (Internet Version Protocol 6) je najnovija verzija IP-a u mrežnoj arhitekturi računala. Prema zadanim postavkama i dalje koristimo IPv4 i još uvijek nismo trajno prešli na IPv6. Međutim, možda postoji netko od vas koji je započeo upotrebu IPv6 za internetsku vezu. Čini se da IPv6 ne radi ispravno s Nord VPN-om. Stoga ćemo ga onemogućiti i provjeriti ponovo.
- Desnom tipkom miša kliknite ikonu mreže koja se nalazi na programskoj traci i odaberite Otvori postavke mreže i interneta . Sada u postavkama kliknite opciju Promijeni opcije adaptora .

- Kada uđete u postavke adaptera, desnom tipkom miša kliknite adapter koji koristite i odaberite Svojstva .
- Nakon što se u adapter svojstva, isključite se IPv6 opciju i provjerite da IPv4 omogućen. Spremite promjene i izađite. Sada ponovo pokrenite računalo i provjerite je li pogreška riješena te se možete povezati s Nord VPN-om.

Rješenje 2: Provjera aplikacija trećih strana
Brojni su drugi programi i programi koji se u svom radu sukobljavaju s Nord VPN-om. Ako postoji više aplikacija koje pokušavaju pristupiti resursu, postojat će uvjeti utrke i oni neće raditi kako se očekivalo.

Trebali biste otvoriti upravitelj zadataka (Windows + R i 'taskmgr') i provjeriti sve programe koji rade u pozadini. Jedna od takvih aplikacija za koju se znalo da stvara probleme bila je Glasswire Elite . Obavezno ga deinstalirajte ili onemogućite kad se pokušavate povezati s Nord VPN-om.
Napomena: Također možete pokušati očistiti pokretanje računala. To će onemogućiti sve vanjske programe treće strane i pokrenuti samo one potrebne. Sada možete pokušati uspostaviti vezu. Ako ste uspješni, znači da je problem uzrokovala neka aplikacija. Možete se vratiti natrag tako što ćete omogućiti svaku aplikaciju i ponovo provjeriti.
Rješenje 3: Promjena lokacije poslužitelja
Nord VPN daje korisnicima mogućnost odabira mjesta poslužitelja. Ovi su poslužitelji raštrkani po cijelom svijetu i pružaju povezanost u skladu sa svojim zemljopisnim položajem, tj. Očekuje se da će poslužitelj bliži vama biti brži. Pokušat ćemo promijeniti mjesto poslužitelja koje pokušavate povezati i vidjeti hoće li to riješiti problem nepovezivanja.
- Pokrenite Nord VPN i kliknite naslov Poslužitelji na vrhu aplikacije.

- Sada odaberite drugi poslužitelj nego prije i nakon odabira, pokušajte ponovno zapaliti VPN. Ako imate isto ponašanje, pokušajte odabrati drugi poslužitelj i testirati mrežu na drugom web mjestu.
4. rješenje: Ponovno pokretanje mrežnog / TAP adaptera
Nord VPN na vašem računalu stvara virtualni mrežni adapter koji može koristiti za komunikaciju informacija. Djeluje poput mosta u kojem Nord VPN mijenja postavke kako bi mogao inicirati i održavati VPN vezu. Ponekad se to dogodi u stanju pogreške zbog čega se ne povezujete sa svojim VPN poslužiteljem. Ponovo ćemo pokrenuti ispravno adapter koji će osigurati da se sve njegove konfiguracije ponovo pokrenu.
- Pritisnite Windows + R, upišite „ ncpa. cpl ”u dijaloškom okviru i pritisnite Enter.
- Svi mrežni adapteri bit će navedeni ispred vas. Odaberite TAP adapter, kliknite ga desnom tipkom miša i odaberite Disable .

- Nakon što ga onemogućite, pričekajte minutu. Zatim ga kliknite desnom tipkom miša i odaberite Omogući . Pokušajte spojiti Nord VPN i provjerite čini li to trik.
Rješenje 5: Ispiranje mrežnog snopa
Postoji bezbroj primjera kada ispiranje (osvježavanje) mrežnog snopa na vašem računalu rješava razne probleme povezane s VPN-om (uključujući Nord). Ovim će se postupkom ukloniti postavke DNS-a i IP-a i osigurati da ne postoje neprikladne postavke koje bi mogle biti u sukobu s aplikacijom.
- Pritisnite Windows + S, u dijaloški okvir upišite "command prompt", kliknite program desnom tipkom miša i odaberite Run as administrator .
- Jednom u povišenom naredbenom retku, izvršite sljedeće naredbe jednu po jednu nakon koje slijedi tipka Enter nakon svake naredbe:
ipconfig / release ipconfig / flushdns ipconfig / renew netsh winsock reset netsh interface ipv4 reset netsh interface ipv6 reset netsh winsock reset catalog netsh int ipv4 reset reset.log netsh int ipv6 reset reset.log

- Sada zatvorite naredbeni redak i pokušajte ponovo pokrenuti Nord VPN. Provjerite možete li se pravilno povezati s njim.
Rješenje 6: Ponovna instalacija Nord VPN-a (zajedno s TAP adapterom)
Ako sve gore navedene metode ne uspiju, trebate biti sigurni da je vaša Nord instalacija ispravna i da se s instalacijskim datotekama nema ništa loše. TAP adapter također će se ponovno instalirati u procesu jer Nord VPN upravlja adapterom i on je samo za njegovu upotrebu. Provjerite jeste li prijavljeni kao administrator. Ako ponovna instalacija ne uspije, provjerite jesu li vaše vjerodajnice ispravne za koje unosite usluge nisu istekle.
- Pritisnite Windows + R, u dijaloški okvir upišite "appwiz.cpl" i pritisnite Enter.
- Jednom u upravitelju aplikacija potražite unos Nord VPN s popisa, kliknite ga desnom tipkom miša i odaberite Deinstaliraj .

- Sada ponovo pokrenite računalo i ponovo preuzmite aplikaciju sa službenog web mjesta Nord VPN-a. Nakon unosa vjerodajnica, pokušajte se ponovo povezati i provjerite možete li pravilno uspostaviti VPN vezu.
Rješenje 7: Korištenje alternativne VPN usluge
Na tržištu Windows postoje brojni VPN klijenti. Međutim, preporučujemo čitateljima da isprobaju CyberGhost. Ova VPN usluga najjednostavnija je i nudi vam poslužitelje smještene u različitim zemljama. Čak ima i zasebne VPN poslužitelje za streaming Netflixa i BBC-a s lakoćom. Slijedite korake u nastavku da biste preuzeli aplikaciju i osigurali vezu u kratkom roku.
- Download CyberGhost from (here).

- After downloading the VPN, install it on your computer. You might be asked for proper permissions. Make sure that you are logged in as an administrator and press Yes to all the permissions asked.
- After CyberGhost is installed on your computer, launch it. Here you will see a list of different servers available along with the distance from your actual location (more distance means slower internet).

- After selecting the server, click on the power button present at the right-hand side of the application. You can also select dedicated servers for torrenting and streaming (present at the left navigation pane).
Solution 8: Disable Firewall
In some cases, the default Windows Firewall might be preventing the application from working properly. Therefore, in this step, we will first be allowing it through the Firewall and make sure that it isn’t blocked by the Firewall and then we will also make sure that Windows Defender has it added as an exception. For that:
- Press “Windows” + “R” to launch the Run prompt.
- Type in “ControlPanel” and press “Enter” to launch the classical control panel interface.

- Click on the “View by:” button, select “Large Icons” and then click on the Windows Defender Firewall option.
- Select the “Allow an app orfeature through the Firewall” button on the left pane and then click on the “Change Settings” button and accept the prompt.
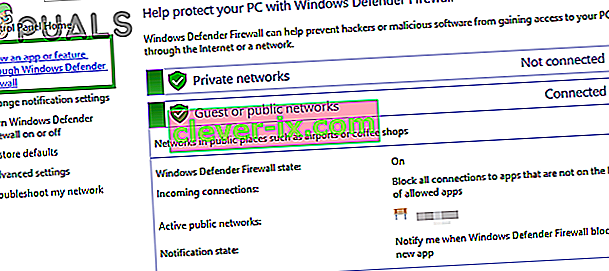
- From here, make sure that you check both the “Public” and the “Private” options for Nord VPN and its related applications/drivers.
- Save your changes and exit out of the window.
- After that, press “Windows” + “I” to launch the settings and click on the “Updateand Security” option.

- From the left pane, click on the “Windows Security” button and then click on the “Virus and Threat Protection” button.
- Select the “Manage Settings” button under the Virus and Threat Protection Settings heading.
- Scroll down and click on the “Add or Remove Exclusions” button in the next window.
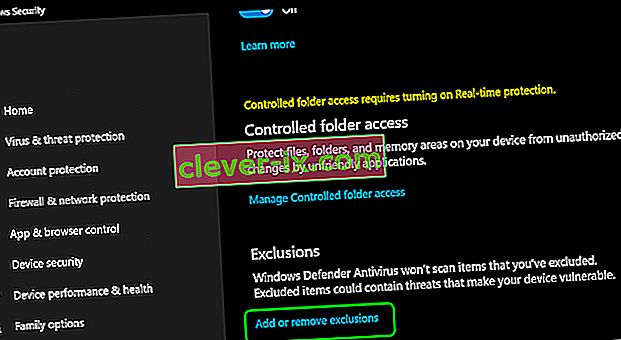
- Click on the “Add an Exclusion” option and select “Folder’ from the File type.
- Make sure to specify the Nord VPN folder and exit out of this window after saving your changes
- Check and see if doing so has fixed the issue with Nord VPN not connecting.


Solution 9: Change NordVPN Protocol
It is possible that Nord VPN might be running into issues while trying to connect to its servers due to the protocol configuration in its settings. If one type of protocol isn’t working for you, it is always recommended to try and switch to the other protocol to make sure that the issue isn’t tied to the wrong selection of the protocol type automatically or manually. For that:
- Launch NordVPN and make sure to disconnect from any currently active sessions.
- Click on the “Gear” icon on the top right corner and go into the settings.
- Click on the “Advanced” option from the left-hand side menu.
- Click on the “Protocol” dropdown and check on “TCP”.
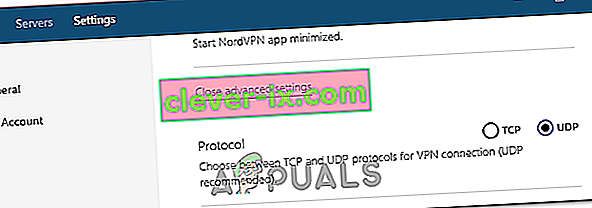
- This should change your protocol from TCP to UDP.
- Check to see if doing so fixes the issue for your computer.
- To Verify that none of the protocols work, make sure to repeat the steps and select “UDP” instead of TCP and then check again.
- If none of the selected protocols are able to make a connection with the server, move on to the other fixes.

Solution 10: Changing DNS Server Configuration
DNS Servers are used by the computer to establish a stable and secure internet connection with other sites on the internet, however, if the computer is unable to detect the DNS settings properly, or if the selected DNS server is facing outage, Nord VPN might not connect properly. Therefore, in this step, we will be changing the DNS configuration to ensure that DNS isn’t an issue. For that:
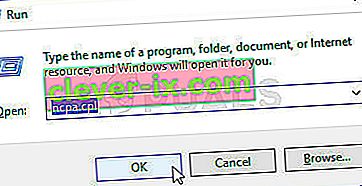
- Press “Windows” + “R” to launch the Run prompt.
- Type in “ncpa.cpl” and press “Enter” on the keyboard to launch the network configuration panel.
- Right-click on your internet connection and select the “Properties” option.
- Double click on the “Internet Protocol Version4 (TCP/IPV4)” option and check on the “Use the following DNS addresses” button.
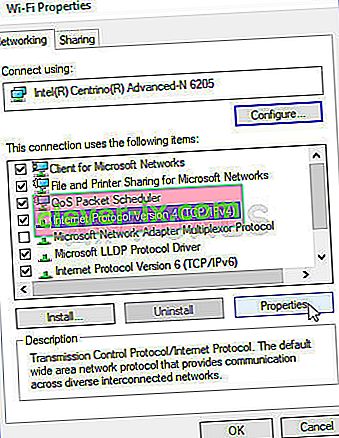
- At first, type in “8.8.8.8” and “8.8.4.4” in the primary and the secondary DNS addresses field respectively and click on “OK”. After that, check to see if NordVPN is connecting, if it isn’t, try to use “103.86.96.100” and “103.86.99.100” in the primary and the secondary fields respectively.
- Check to see if you are able to make a connection by selecting those DNS servers.


Solution 11: Opening Ports
For some people, the issue might arise if the ports that NordVPN uses to communicate with its servers are being blocked by your router. For security reasons most routers often block ports used by VPN/Network Tools to prevent any alterations to your connections and if that is the case, we will have to open the ports by logging in to the router’s control panel. For that:
- Press “Windows” + “R” to launch the Run prompt and type in “cmd” and then press “Ctrl” + “Shift’ + “Enter” keys on your keyboard to provide admin permissions.

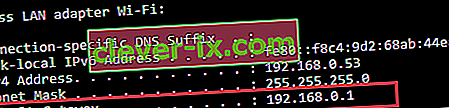
- Type in the following command in the command prompt to list the IP information.
ipconfig /all
- The computer will list all the information of the network adapters connected to your computer.
- Under the default gateway option, after the mac address, there should be an IP address that should look something like “192.168.x.x”.
- Copy this IP address and launch your browser.
- Paste the IP address within a new tab on the browser and press “Enter” to navigate to the browser’s login page.
- Once on the login page, log into the control panel with your credentials, both of which, i.e the username and password should be written on the back of your internet router. If not, then the username should be admin and the password should be the Wifi password that you use to connect your devices.
- After logging into the Control panel, look around for a “NAT” or “Port” option that allows you to forward ports.
- Type in “500” and select “UDP” from the list.
- Click on “Save” to forward the 500 UDP port and exit out of the control panel after the change has been made.
- Try connecting with Nord VPN and check to see if the issue persists.


Solution 12: Use Hotspot
Mostly, this error can be fixed simply by employing your mobile’s hotspot connection instead of the Wifi or the Wired connection that you are already using on your computer. This does seem an inconvenience for Data conscious people but it seems to be the only way some people are able to connect through Nord VPN as some routers block it completely.
Note: In addition to this, you can try to change the firmware on your router to avoid any permanent blocks put from the router or to eliminate any bugs with the connection.


