Windows 10 jedna je od najočekivanijih Microsoftovih verzija sustava Windows. Iako je Windows 8 stvorio novi trend u svijetu Desktop OS-a, imao je nekih problema u dizajnu i izvedbi koji su bili glavni fokus Microsofta u sustavu Windows 10. Dakle, Windows 10 Final Build objavljen je 29. srpnja 2015. za Desktop kao kao i pametni telefoni.
Sadržavao je puno modifikacija zadržavajući u vidu nedostatke sustava Windows 8. Zapravo je riječ o naprednoj verziji sustava Windows, no svejedno postoji niz posljedica koje se svakodnevno događaju kod različitih korisnika.
Glavni dio tih posljedica su pogreške koje se pojave prilikom pokušaja izvršavanja određenog zadatka. Brojni su ljudi naišli na poruku o pogrešci dok su pokušavali otvoriti različiti softver i preglednike unutar svog Windows 10. Ova pogreška dolazi s porukom o pogrešci koja kaže da se aplikacija nije uspjela pravilno pokrenuti (0xc0000005). Kliknite U redu da biste zatvorili aplikaciju . Ova se pogreška obično događa kod internetskih preglednika, ali nije ograničena na njih. Bilo koja aplikacija unutar sustava Windows može prestati reagirati zbog ove pogreške. Dakle, to treba popraviti kako bi se taj neophodni softver vratio natrag u rad.

12.11.2016 .: Korisnici su izvijestili da će dolje navedene metode raditi i na sustavu Windows 7.
Razlog iza pogreške 0xc0000005 u sustavu Windows 10:
Postoji niz poznatih razloga zbog kojih ova pogreška ometa rad različitih softvera u sustavu Windows 10. Jedan od razloga koji se smatraju glavnim uzrokom je antivirusni program treće strane koji izaziva sukobe s izvršnim datotekama i utječe na njihovo poslovanje. S druge strane, registri se mogu oštetiti zbog zlonamjernog softvera i virusa zbog kojih se programi ponašaju neobično. Krivac koji uzrokuje ovu pogrešku ponekad mogu biti i loši upravljački programi .
Rješenja za ispravljanje pogreške u sustavu Windows 10 0xc0000005:
Na temelju gore spomenutih razloga, rješenja su neposredna. Dakle, prođite kroz sljedeće metode kako biste se riješili ove frustrirajuće poruke o pogrešci.
Popravite oštećene datoteke sustava
Preuzmite i pokrenite Restoro skenirati i vratiti korumpirane i nestalih datoteka iz ovdje , jednom učinio nastaviti s rješenjima u nastavku. Prije nastavka s donjim rješenjima važno je osigurati da su sve sistemske datoteke netaknute i da nisu oštećene.
Metoda 1: Ispravljanje antivirusnog programa
Antivirusni programi mogu utjecati na izvršne datoteke brojnih programa. Dakle, da biste riješili taj problem, morate onemogućiti antivirusni program treće strane da biste provjerili je li krivac ili nije. Imajte na umu da onemogućavanje antivirusnih programa može rezultirati ozbiljnim prijetnjama vašem računalu kada je povezano s internetom.
Možete se osloniti i na vlastiti sigurnosni softver sustava Windows, tj. Windows Defender . Ima istu funkcionalnost kao i bilo koji drugi antivirus. Možete onemogućiti antivirusni program tako da prijeđete na njegove postavke i isključite štit.

Nakon što je onemogućen, ponovno provjerite ima li pogreške. Ako se i dalje nastavi, prijeđite na sljedeću metodu.
Metoda # 2: Popravljanje registra
Registra je centralna baza podataka sustava Windows koji se stalno koriste računala kako bi ga pročitao mnogo različitih datoteka i postavki koje treba pokrenuti. Registri se mogu oštetiti zbog oštećenja određenih datoteka potrebnih za slaganje svega na svoje mjesto. Stoga većina stručnjaka preporučuje da napravite sigurnosnu kopiju registra i da ovu sigurnosnu kopiju čuvate na uobičajenom USB ključu kako biste u slučaju oštećenja mogli oživjeti svoj registar u prethodnom stanju. Ako niste napravili sigurnosnu kopiju registra, slijedite ove korake da biste popravili registre kako biste riješili pogrešku 0xc0000005 .
1. Preuzmite softver za čišćenje registra s ove veze .
2. Nakon preuzimanja, instalirajte ga pomoću preporučenih postavki. Otvorite softver nakon završetka postupka instalacije.
3. Na sučelju kliknite karticu Registry koja se nalazi na lijevom oknu i kliknite gumb s oznakom Skeniraj za probleme . Započet će traženje pogrešaka u registru, a kada će pretraživanje biti završeno, aktivirat će se gumb Popravi odabrani problem . Pritisnite taj gumb i sve će biti popravljeno.

Metoda # 3: Ispravljanje neispravnih upravljačkih programa
Upravljački programi su softverski programi koji pomažu računalu da komunicira s hardverom priključenim na njega. Dakle, kada su oštećeni, hardver obično uzrokuje kvarove . Popravak ovih neispravnih ronilaca može vam pomoći na više načina. Slijedite korake u nastavku.
1. Otvorite Upravitelj uređaja pritiskom na tipke Win + X i odabirom s popisa.
2. Unutar Upravitelja uređaja pomaknite se prema dolje da biste vidjeli postoji li hardver sa žutom oznakom. Ako postoji, kliknite desnu tipku miša i odaberite Ažuriraj upravljački program . Ako ste nedavno instalirali upravljačke programe, ponovno instalirajte i te upravljačke programe.

3. U prozoru koji se pojavi nakon, kliknite Automatsko traženje ažuriranog softvera upravljačkog programa kako biste ga automatski pretraživali i instalirali. U slučaju da ste ručno preuzeli upravljačke programe, kliknite donju opciju da biste ih pregledali i instalirali. Nakon završetka postupka provjerite ima li pogreške.

Metoda # 4: Ispravite BCD
Ovu metodu korisnici trebaju provoditi na vlastiti rizik. Ovo je nekima uspjelo, a nekima nije. Nakon izvršavanja koraka u ovom vodiču morat ćete ponovno aktivirati Windows.
- Držite Windows ključ i Pritisnite X . Odaberite naredbeni redak (administrator)
- Upišite " bcdedit" i pritisnite ENTER. Ako je vaš Windows Boot Loader Path xOsload.exe, tada morate ukloniti neke datoteke i popraviti svoj BCD. To možete vidjeti u polju PATH nakon izvršavanja naredbe " bcdedit".
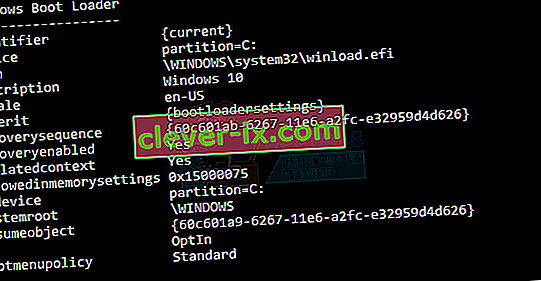
- Kada završite, izvršite sljedeće naredbe u nastavku, neke će se možda vratiti ne pronađene, ali zanemariti pogreške i nastaviti do posljednjeg. Svakako pritisnite tipku ENTER nakon svake naredbe.

Del D: \ Windows \ System32 \ xOsload.exe Del D: \ Windows \ System32 \ xNtKrnl.exe Del D: \ Windows \ System32 \ Drivers \ oem-drv64.sys attrib c: \ boot \ bcd -h -r -s ren c: \ boot \ bcd bcd.old bootrec / rebuildbcd
5. metoda: Provjera ažuriranja sustava Windows
Ažuriranja za sustav Windows često sadrže ispravke za neke bugove i propuste, ali su također poznata po tome što ustupaju mjesto novim problemima na računalima ljudi. Međutim, u ovom ćemo koraku provjeravati ima li ažuriranja za vaš operativni sustav jer Microsoft često zakrpi sve probleme koji proizlaze iz njihovih ažuriranja. Da biste to učinili, slijedite donji vodič.
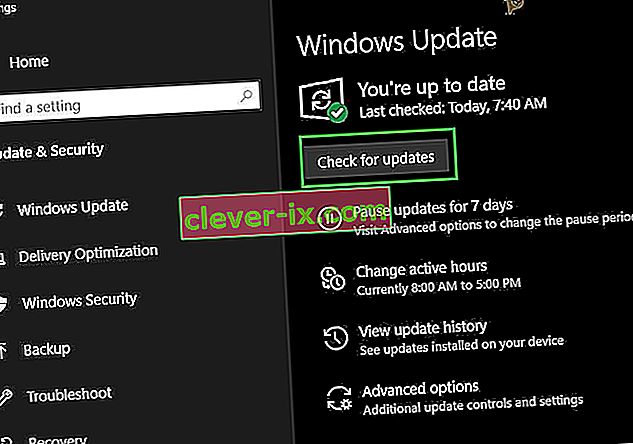
- Pritisnite "Windows ' + " I " da biste otvorili postavke sustava Windows.
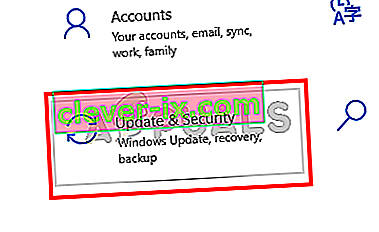
- U postavkama kliknite opciju "Ažuriranja i sigurnost", a s lijeve strane odaberite opciju "Windows Update" .
- Na sljedećem zaslonu kliknite opciju "Provjeri ažuriranja" i sustav će automatski zatražiti da provjeri ima li dostupnih ažuriranja.
- Po završetku provjere ažuriranja kliknite gumb "Preuzmi" da biste pokrenuli preuzimanje i instalaciju novih ažuriranja na računalo.
- Nakon instaliranja ovih ažuriranja, provjerite je li to riješilo problem na vašem računalu.


Metoda 6: Obnavljanje računala
Ako ste tek započeli s dobivanjem ovog problema, možda se pokreće zbog neispravne instalacije upravljačkog programa ili čak zbog nevaljale aplikacije koju ste nedavno instalirali na računalo. Stoga ćemo u ovom koraku vratiti stanje računala na raniji datum i nadamo se da bi to moglo popraviti naš problem ako je to bilo zbog gore navedenih razloga. Da biste to učinili:
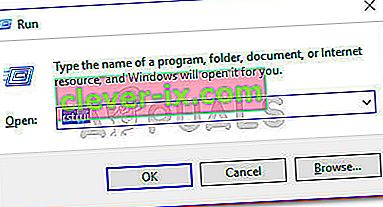
- Pritisnite "Windows" + "R" da biste otvorili upit za pokretanje.
- Upišite "rstrui" i pritisnite "Enter" da biste otvorili prozor za upravljanje vraćanjem.
- Kliknite "Dalje" i označite opciju "Prikaži više bodova za vraćanje" .
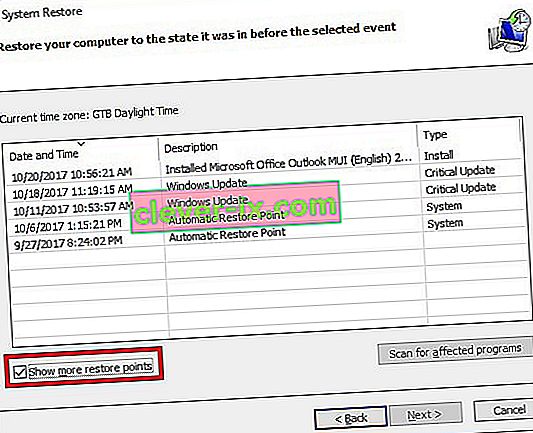
- S popisa odaberite točku vraćanja koja je prije datuma kada se ovaj problem počeo javljati.
- Ponovno kliknite "Dalje" i slijedite upute na zaslonu da biste vratili sve natrag na odabrani datum.
- Nakon završetka obnavljanja provjerite nastavlja li problem i dalje.


7. metoda: Omogućite vatrozid
Moguće je da se u nekim slučajevima pokreće pogreška jer je aplikacija sumnjiva ili barem ako je označena kao sumnjiva, a vatrozid Windows ne radi na vašem računalu kako bi potvrdio ovu sumnjivost. Stoga ćemo u ovom koraku biti sigurni da je omogućen Windows vatrozid kako bismo se riješili ove pogreške. Za to:
- Pritisnite "Windows" + "R" da biste otvorili upit za pokretanje.
- Upišite "Upravljačka ploča" i pritisnite "Enter" da biste pokrenuli klasično sučelje upravljačke ploče.
- Na upravljačkoj ploči kliknite opciju "View By:" i odaberite gumb "Large Icons" .
- Nakon odabira, kliknite opciju "Vatrozid Windows Defender" da biste pokrenuli vatrozid, a zatim odaberite "Uključivanje ili isključivanje vatrozida Windows Defender".
- Svakako provjerite "Uključi vatrozid sustava Windows Defender" za obje dostupne opcije za uključivanje vatrozida.
- Nakon odabira, spremite promjene i zatvorite se iz prozora.
- Nakon toga provjerite nastavlja li problem i dalje.


8. metoda: Pokrenite SFC skeniranje
U nekim ste situacijama možda instalirali loš upravljački program na računalo ili u nekom trenutku zbog kvara na pohrani neke sistemske datoteke ili upravljački programi možda su oštećeni. Stoga ćemo u ovom koraku pokrenuti cjelovito skeniranje sustava kako bismo identificirali upravljačke programe kojima nedostaju potpisi ili otklonili bilo kakve abnormalnosti u sistemskim datotekama. Za to:
- Pritisnite „Windows ' + „ R “ da biste otvorili upit za pokretanje.
- Upišite "cmd", a zatim pritisnite "Shift" + "Ctrl" + "Enter" da biste dobili administratorska dopuštenja. Pokretanje naredbenog retka
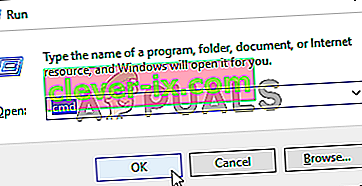
- Upišite sljedeću naredbu unutar naredbenog retka i pritisnite "Enter" da biste je izvršili.
sfc / scannow
- Let the computer scan for any broken or corrupted items and it should automatically replace them with working ones.
- Check to see if doing so fixes the error message.

Method 9: Disabling Data Execution Prevention
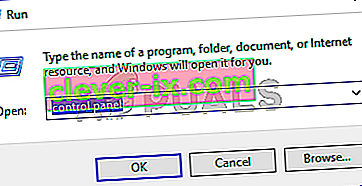
Data Execution Prevention is a program that prevents certain programs or executables from being able to run on your computer because it suspects that they might be viruses. Due to this prevention, sometimes, as a false alarm, legit applications might also face issues while trying to run on your computer. Therefore, in this step, we will be disabling this setting from the system configuration panel. For that:
- Press ‘Windows’ + “R’ to open the Run prompt.
- Type in “Control Panel” and press “Enter” to launch the classical control panel interface.

- Inside the Control Panel, click on the “View By:” icon and then select the “Large Icons” option.
- After selecting Large Icons, select the “System” option.
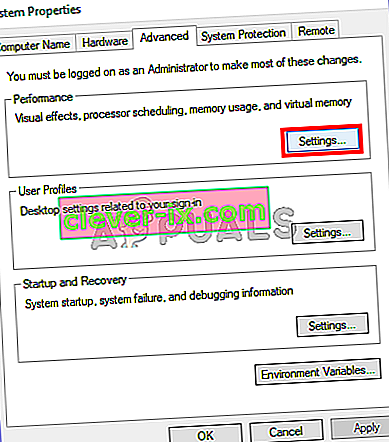
- Click on the “Advanced System Settings” option on the left side of the screen.
- In the advanced System Settings, click on the “Advanced” tab from the top.
- In the advanced tab, click on the “Settings” option under the “Performance” heading.
- On the next window that opens up, click on the “Data Execution Prevention” tab, and then select the “Turnon DEP for all programs except thoseI Select” option.
- After that, click on the “Add” option and point to the executable of the application that you are facing issues with.
- This way, that application will no longer come under the jurisdiction of the DEP program.
- Check to see if doing so has fixed the issue.


If the above process is unable to fix the issue, it might be because the executable isn’t the only one being affected by the DEP program. Sometimes the DEP might actually be preventing a herd of executables from being run on the computer and to counter this we will be disabling DEP completely.
Disabling DEP completely cannot be done through any Windows setting and it needs to be done manually through the command prompt. Remember to take this step as a last resort because this can in some cases makes your computer more vulnerable to viruses and malware attacks. In order to disable DEP through the command prompt:
- Press “Windows” + “R’ to open the Run prompt.
- Inside the Run prompt, type in “cmd” and then press “Shift” + “Ctrl” + “Enter” to launch in admin mode.
- Inside the command prompt, type in the following command and press “Enter” to execute it on your computer.
bcdedit.exe /set {current} nx AlwaysOff - Once the command has been executed, run the application that you want to and check to see if the error message still persists.
Method 10: Disable Firewall and Windows Defender
In some situations, the executable that you want to run on the computer might actually be blocked by the Firewall and it would not be able to make contact with its servers this way. Therefore, we will have to allow the executable in our Firewall for both public and private networks which should get it working if the Firewall is preventing it.
In addition to that, sometimes the Windows Defender might prevent the application from running on your computer because its local files might be suspicious and not properly signed. This can be due to a false alarm as well so we will be disabling the Windows Defender for the application as well by adding an exclusion. In order to do that:
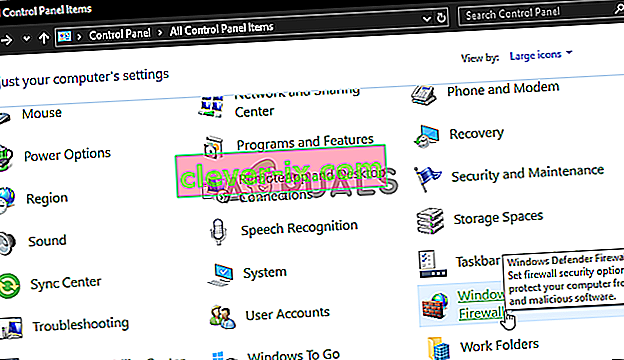
- Press “Windows” + “R” to launch the Run prompt.
- Type in “ControlPanel” and press “Enter” to launch the classical control panel interface.
- Click on the “View by:” button, select “Large Icons” and then click on the Windows Defender Firewall option.
- Select the “Allow an app orfeature through the Firewall” button on the left pane and then click on the “Change Settings” button and accept the prompt.
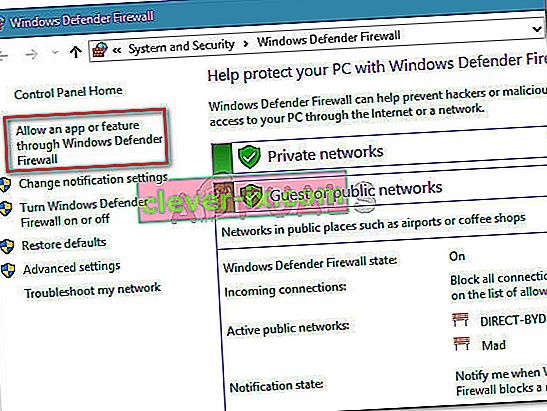
- From here, make sure that you check both the “Public” and the “Private” options for the application and its entries.
- Save your changes and exit out of the window.
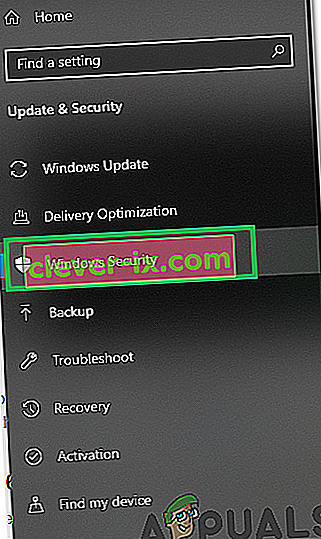
- After that, press “Windows” + “I” to launch the settings and click on the “Updateand Security” option.

- From the left pane, click on the “Windows Security” button and then click on the “Virus and Threat Protection” button.
- Select the “Manage Settings” button under the Virus and Threat Protection Settings heading.
- Scroll down and click on the “Add or Remove Exclusions” button in the next window.
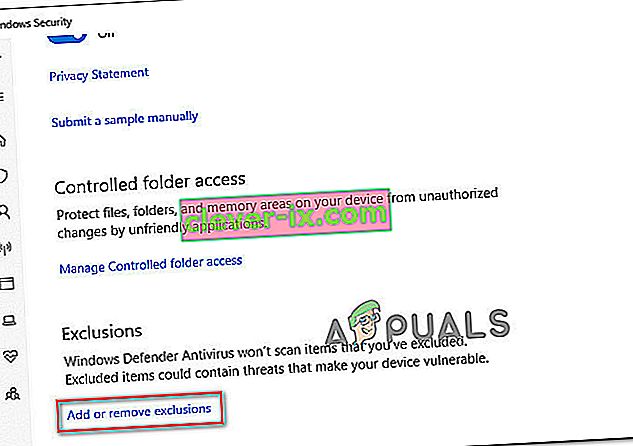
- Click on the “Add an Exclusion” option and select “Folder’ from the File type.
- Make sure to specify the application’s folder with which the issue is occurring and exit out of this window after saving your changes
- Check and see if doing so has fixed the error message.


Method 11: Reinstall Firefox
If you are getting this error while trying to launch Firefox, it might be occurring because the applications haven’t been installed properly on your computer. Therefore, in this step, we will be launching the app management window and uninstalling Firefox after which we will reinstall it completely by downloading it from the Firefox website. For that:
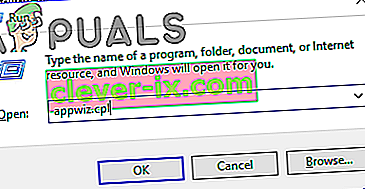
- Press “Windows” + “R” to open the Run prompt.
- Type in “appwiz.cpl” and press “Enter” to open the app management window.
- In the app management window, scroll down and right-click on the “Firefox” application.
- Select “Uninstall” from the list and then follow the on-screen instructions to remove the software from your computer.
- Repeat this step for all instances and bundled applications of the software installed on your computer.
- Make sure to disable any third-party antiviruses at this point to make sure that the software is installed smoothly.
- Head on over to the Mozilla website and click on the download button.

- Click on the downloaded executable and install it on your computer following the on-screen instructions.
- Check to see if doing so has fixed the error message on your computer.


Method 12: Scanning for Malware
It is possible in some cases that the computer has acquired malware that is preventing the user from being able to run all the system functions on their computer. Therefore, in this step, we will be using the default Windows Defender to scan our computer thoroughly for any viruses or malware that might’ve found its way on our computer. For that:
- Press the “Windows” + “I” keys simultaneously on your PC to open the Settings tab.
- Navigate to the Update& Security option and then click on the “Windows Security” button on the left tab.
- After that, click on the “Open Windows Security” and select the “Virus and Threat Protection” option.
- After that, click on the “Scan Options” button below the “Quick Scan” window.
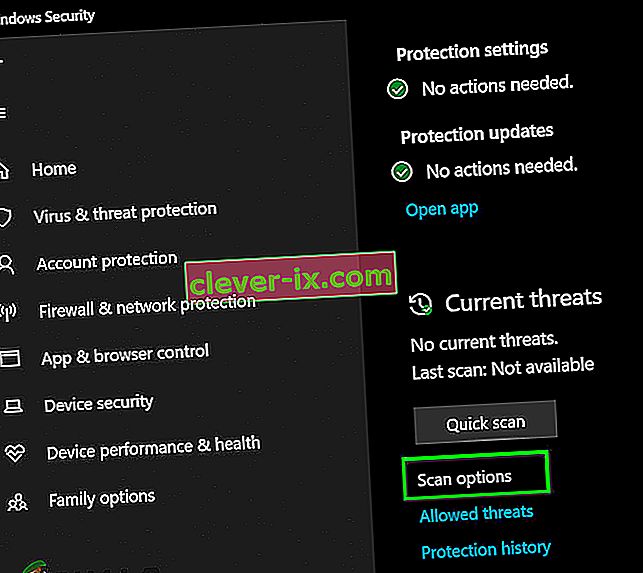
- Click on the “Full Scan” option and then hit the button of “Scan Now”.
- Wait for a few seconds while this process gets completed and then finally check if the error gets resolved now.


Microsoft Security Scanner is an additional tool that you can use to test the system for any further viruses and malware because sometimes the default tool isn’t able to perform the scan properly. Therefore, in this step, if the issue still hasn’t been resolved, we will be using the Microsoft Security Scanner to further make sure for any issues.
- Launch your browser and download the Microsoft Security Scanner from here.
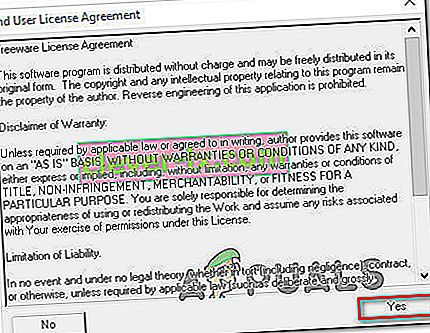
- After downloading the executable, run it on your computer and let it install.
- Accept the License Agreement terms and click on “Next”.
- Select “Full Scan” and click on “Next”.
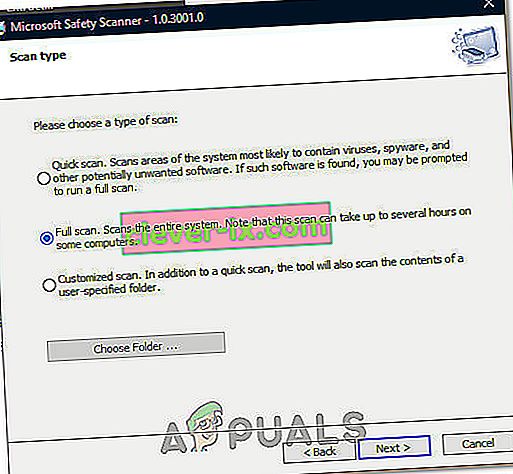
- After you opt for a full scan, the software will start scanning your entire computer to look for any malware or viruses that might’ve disguised themselves as normal executables or applications.
- After this scan has been finished, check to see if the error message still persists.


Method 13: Install Missing Drivers
It is possible in some situations that your device is missing certain drivers due to which this particular issue is being triggered on your computer. Therefore, we will be checking for any missing drivers and then we will check to see if the error is fixed. In order to do this, follow the guide below.
- Download Driver Easy on your computer.

- Run the downloaded executable and install the software on your computer.
- Run the check and see if there are any missing drivers on your computer.
- Install these missing drivers and then install them either manually or automatically using the Software.
- After installing all the missing drivers, check to see if the issue still persists.

Method 14: Reconfigure Registry
It is possible that in some cases, you haven’t properly configured all the registry settings or that you unknowingly configured something incorrectly. Therefore, in this step, we will be reconfiguring our Registry to fix a certain key that sometimes, if misconfigured, causes this particular error on Windows. In order to do this, follow the guide below.
- Press “Windows” + “R” to open the Run prompt.
- Type in “regedit” and press “enter” to launch the registry editor.
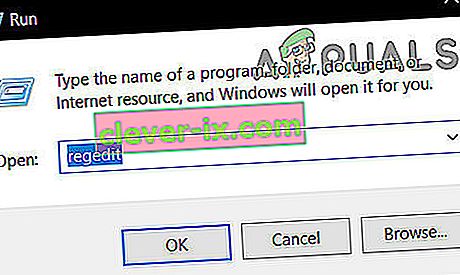
- Inside the registry editor, navigate to the following location.
HKLM\SOFTWARE\Microsoft\Windows NT\CurrentVersion\Windows\AppInit_Dlls
- Double click on the “LoadAppInit_DLLs” entry on the right side of the screen.

- Change the value of this registry from “1” to “0”.
- Save your changes and exit the registry editor.
- Check to see if doing so has fixed the error.


Method 15: Update Disk Drivers
In some cases, the Disk Drivers that are being used to control your Storage and other Disks installed on the computer might have been outdated due to which the error is being triggered. Therefore, in this step, we will first be opening the Device Management Window and from there, we will be updating these drivers. In order to do so, follow the steps mentioned below.
- Press “Windows’ + “R” to open the Run prompt.
- Type in “Devmgmt.msc” and press “Enter” to launch the device management window.

- In the Device Manager, double click on the “DiskDrives” option to expand it.
- Right-click on the storage device listed and select the “Update Driver” option.
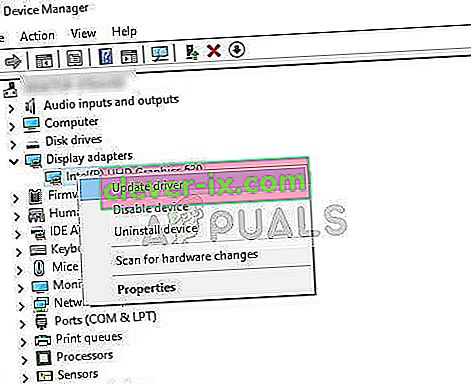
- Select the “Search Automatically for Drivers” option and let the setup search.
- If there are any drivers available, Windows will automatically check for them and install them on your computer.
- Check to see if doing so has fixed the issue.


Method 16: Disabling Automatic Updates and Uninstalling Updates
It is possible in some cases, that this error is stemming from a faulty update install. Microsoft is notorious for pushing out updates that aren’t properly customized to work for all hardware combinations and often go on to break things instead of making them better. Therefore we will make sure that the recent update isn’t installed on our computer.
In order to do this, we will have to first disable automatic updates on our computer and then we will be uninstalling the recently installed updates. Make sure to back up any important data that you don’t want to lose just in case this goes bad.
- Press “Windows” + “R’ to open the Run prompt.
- Type in “service.msc” and press “Enter”.
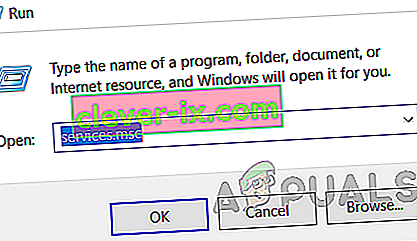
- Scroll through the list and double click on the “Windows Update” service.
- Click on the “Stop” button and then click on the “Startup Type” dropdown.
- Select “Disabled” from the list and select the “Apply” button from the window.
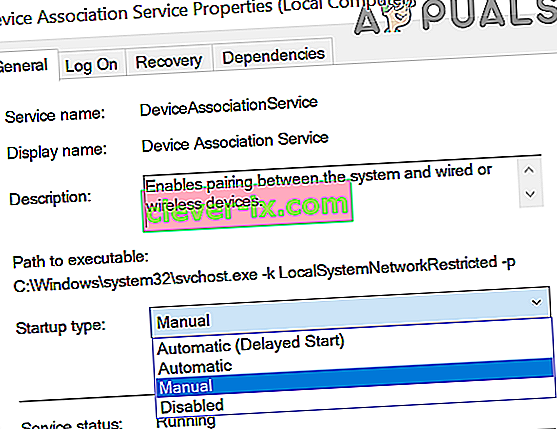
- Click on “OK” to close out of this window.
- Check to see if doing so has stopped your computer from updating.


After stopping the computer from updating, we will now be uninstalling the recent updates that have been installed on your computer. For that:
- Press “Windows” + “I” buttons to open the settings.
- In settings, click on the “Update and Security” option and then select the “Windows Update” button from the left pane.

- In the Windows Update, click on the “View Update History” option.
- In the Update History, click on the “Uninstall Updates” option and it should take you to the uninstallation screen where all the recently installed updates will be listed.
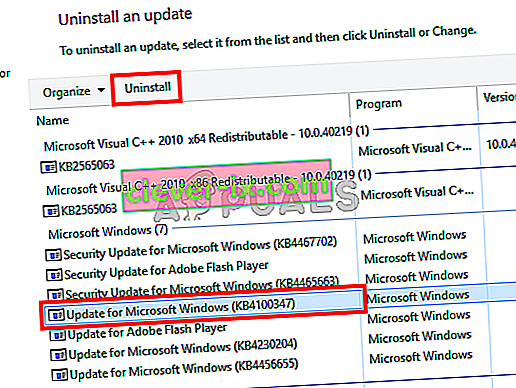
- From the list, right-click on the update that was installed recently and caused this error on your computer.
- Right-click on this update and select the “Uninstall” button to remove it completely from the computer.
- Follow through with the on-screen instructions.
- Check to see if uninstalling has fixed this issue.


Additional Fixes:
- In addition to some of the recommendations given above, you should try to check if there are any bad memory modules (RAM) installed on your computer which can be a cause of this.
- Također provjerite niste li overclockali RAM na razinu veću od preporučene granice. Ako ste to učinili, pokušajte ga vratiti na tvorničke postavke i provjerite rješava li to vaš problem.


