Neki korisnici Windowsa koji su nedavno nadogradili na Windows 10, žalili su se što se traka zadataka više puta zamrzavala. Kad se to dogodi, korisnici ne mogu kliknuti nijedan element na programskoj traci, tj. Izbornik Start, ikone, obavijesti. Također, prečaci poput Windows + R i Windows + X ne rade.
Ovaj problem nema osnovni uzrok, jer je vrlo čest u sustavu Windows. Neki su ga, međutim, povezali s Dropboxom i nekoliko neispravnih aplikacija. U ovom ćemo članku istražiti razne mogućnosti pomoću kojih možemo riješiti ovaj problem. To uključuje pokretanje SFC skeniranja, deinstaliranje određenih aplikacija, pokretanje Explorera, između ostalog.
1. metoda: Ponovno pokretanje Windows Explorera
- Pritisnite tipke Ctrl + Shift + Esc da biste pokrenuli Windows Task Manager.
- U upravitelju zadataka kliknite Datoteka > Pokreni novi zadatak . Upišite Explorer u otvoreni okvir, a zatim potvrdite okvir "Stvori ovaj zadatak s administrativnim privilegijama" i kliknite U redu .

Možete i:
- Pritisnite tipke Ctrl + Shift + Esc da biste pokrenuli Windows Task Manager.
- Potražite Explorer na kartici procesa
- Desnom tipkom miša kliknite unos Explorera i odaberite Restart .
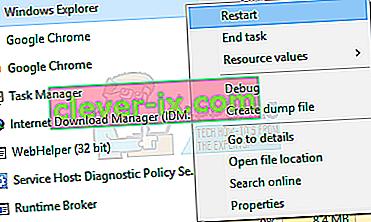
- Explorer će se ponovno pokrenuti i programska bi traka trebala ponovno početi raditi

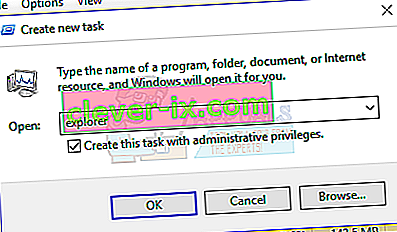
2. metoda: Pokretanje SFC skeniranja
- Pritisnite tipke Ctrl + Shift + Esc da biste pokrenuli Windows Task Manager.
- U upravitelju zadataka kliknite Start> Pokreni novi zadatak . Upišite cmd u otvoreni okvir, a zatim potvrdite okvir "Stvori ovaj zadatak s administratorskim privilegijama" i kliknite U redu .
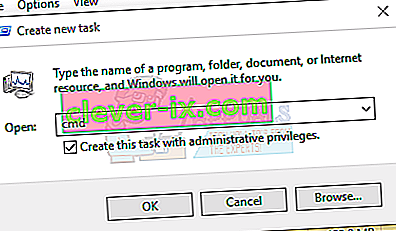
- U naredbeni redak upišite sljedeće naredbe i pritisnite Enter nakon svake naredbe:
sfc / scannow dism / Online / Cleanup-image / Restorehealth
Ovo će pokrenuti provjeru sistemske datoteke i popraviti sve oštećene sistemske datoteke na vašem računalu.
- Ponovo pokrenite računalo i provjerite je li zamrznuta programska traka prestala.

3. metoda: Powershell Fix
Upotrijebite ovu naredbu Powershell za odmrzavanje smrznute programske trake pomoću ovih koraka.
- Ctrl + Shift + Esc tipke za pokretanje Windows upravitelja zadataka.
- Kliknite Više pojedinosti , odaberite karticu Usluge i provjerite je li pokrenut MpsSvc (vatrozid Windows).
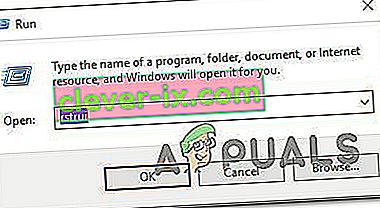
- Pritisnite tipku Windows + R da biste otvorili upit Run (Pokreni). Upišite PowerHell u prompt i pritisnite Enter.
Ako se upit za pokretanje ne otvori, pritisnite tipke Ctrl + Shift + Esc da biste pokrenuli Windows upravitelj zadataka, kliknite Start> Pokreni novi zadatak . Upišite PowerHell u otvoreni okvir, a zatim potvrdite okvir "Stvori ovaj zadatak s administrativnim privilegijama" i kliknite U redu .
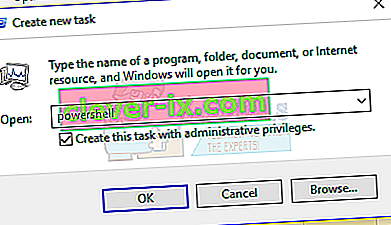
- U prozor Powershell zalijepite sljedeću naredbu i pritisnite Enter:
Get-AppXPackage -SviKorisnici | Foreach {Add-AppxPackage -DisableDevelopmentMode -Register “$ ($ _. InstallLocation) \ AppXManifest.xml”}. - Vaša programska traka nakon toga trebala bi biti potpuno funkcionalna.

4. metoda: Omogućite Upravitelj korisnika
Onemogućeni upravitelj korisnika može rezultirati smrznutom programskom trakom sustava Windows 10. Pokušajte ponovno omogućiti Upravitelj korisnika ovim koracima.
- Pritisnite tipku Windows + R , upišite services.msc i kliknite U redu . Ovo otvara konzolu usluga.
- Potražite User Manager i dvaput ga kliknite.
- Postavite vrstu pokretanja na Automatski i pokrenite uslugu ako je zaustavljena. Kliknite U redu .

- Ponovo pokrenite računalo i programska bi traka u ovom trenutku trebala savršeno funkcionirati.

5. način: Deinstaliranje aplikacija
Neki su korisnici identificirali određene aplikacije zbog kojih programska traka nije ispravno funkcionirala. To su Dropbox i Classic Shell . Ako sumnjate da postoji neka aplikacija koja to uzrokuje, možete je i ukloniti.
- Pritisnite tipke Windows + R da biste otvorili upit za pokretanje. Upišite appwiz. cpl i pritisnite Enter .
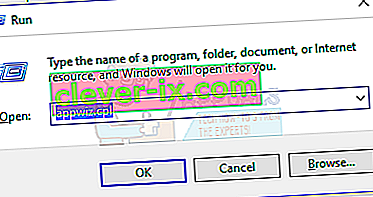
- Pronađite aplikaciju na popisu instaliranih aplikacija, a zatim je dvaput kliknite. Sada slijedite upute da biste dovršili deinstalaciju.
- Ponovo pokrenite računalo, a zatim provjerite funkcionira li programska traka sada ispravno.

Metoda 6: Onemogućavanje nedavno otvorenih stavki
Nedavno otvorene stavke mogu usporiti pokretanje popisa. Onemogućavanje ih čini bržim i sprječava smrzavanje. Slijedite ove upute da biste onemogućili nedavno otvorene stavke.
- Pritisnite Win + I da biste otvorili aplikaciju Postavke.
- Idite na Personalizacija> Start
- Pomaknite gumb za prebacivanje pored Pokaži nedavno otvorene stavke na Skoči popisima na Start ili na programskoj traci da biste ga isključili.

- Vaša se programska traka ne bi trebala smrznuti pri pokretanju prilikom sljedećeg ponovnog pokretanja

7. način: Resetiranje zadanih usluga Windows 10
Ako u ovom trenutku nijedna od gore navedenih metoda nije uspjela, pokušajte pokrenuti ovu skriptu kao administrator tako da je kliknete desnom tipkom miša i odaberete Pokreni kao administrator . Ako iz nekog razloga vaš WiFi više ne radi, slijedite korake ovdje (u Metodi 3 - Korak 2: Opcija 2) da biste riješili problem s WiFi-jem.
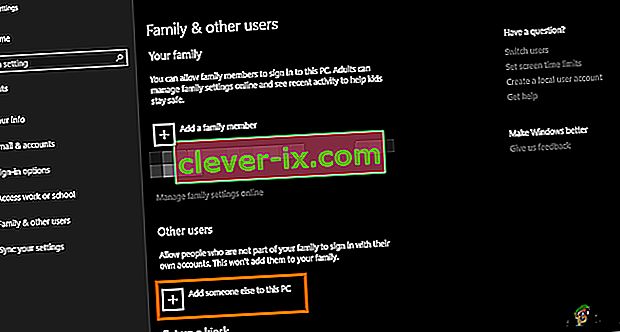
8. metoda: Stvorite novi korisnički račun
U nekim se situacijama pogreška može pokrenuti ako postavke ili konfiguracije vašeg korisničkog računa nisu pravilno postavljene, a također postoji i bilo kakva oštećenja u ovim podacima o konfiguraciji. Stoga, kao alternativu, možete pokušati stvoriti novi korisnički račun na vašem Windows 10 računalu, a zatim kasnije uvesti podatke sa starijeg računa ako riješi problem. Da biste to učinili:
- Pritisnite "Windows" + "I" da biste otvorili postavke i kliknite opciju "Računi" .
- U opciji računa kliknite gumb "Obitelj i ostali korisnici" s lijeve strane.
- Na izborniku odaberite opciju " Dodaj još nekoga na ovo računalo ".
- Kliknite gumb " Nemam podatke o prijavi ove osobe " u sljedećem prozoru.
- Kliknite opciju "Dodaj korisnika bez Microsoftovog računa" u novom prozoru koji se otvori.

- Unesite korisničko ime korisničkog računa i dodijelite mu lozinku.
- Unesite sigurnosna pitanja, odgovorite na njih, a zatim kliknite opciju "Dalje" .
- Nakon stvaranja ovog računa, kliknite ga, a zatim odaberite opciju "Promijeni vrstu računa" .
- Kliknite padajući izbornik "Vrsta računa", a zatim odaberite opciju "Administrator" .
- Spremite promjene i prijavite se na ovaj račun.
- Nakon prijave na račun, pokrenite Steam i provjerite radi li igra.


Ako na taj način riješite problem na računalu, uvezite podatke korisničkog računa s prethodnog računa na ovaj novi i nastavite ga normalno koristiti.
Metoda 9: Dijagnosticiranje u sigurnom načinu
Ponekad ste na svoje računalo instalirali neke programe treće strane koji vam možda onemogućuju pravilno pokretanje programske trake ili s njom povezanih usluga. Uz to, moguće je da čak i Windows ili Microsoftova usluga onemogućavaju pravilno funkcioniranje računala. Stoga ćemo u ovom koraku dijagnosticirati ovaj problem u sigurnom načinu, a zatim ćemo provjeriti može li se riješiti. Za to:
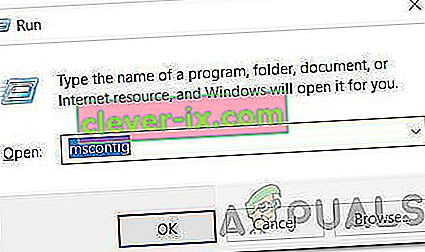
- Pritisnite " Windows" + " R" da biste pokrenuli upit za pokretanje.
- Upišite " MSCONFIG" i pritisnite " Enter" da biste pokrenuli Microsoft konfiguracijski prozor.
- U ovom prozoru kliknite karticu "Usluge" i poništite "Sakrij sve Microsoftove usluge"
- Nakon poništavanja odabira ove opcije, kliknite gumb "Onemogući sve" i kliknite "Primijeni" da biste spremili promjene.
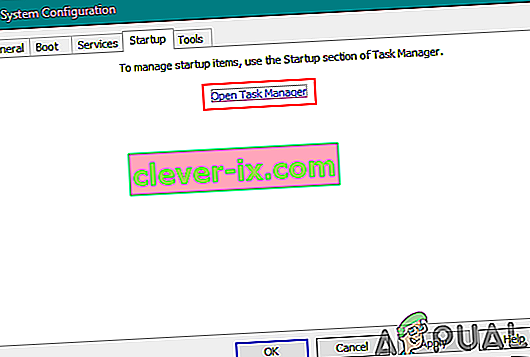
- Nakon toga kliknite karticu "Pokretanje", a zatim kliknite gumb "Otvori upravitelj zadataka" da biste pokrenuli upravitelj zadataka.
- U upravitelju zadataka kliknite svaki omogućeni program, a zatim kliknite gumb "Onemogući" da biste spriječili njegovo pokretanje pri pokretanju.
- Ponovo pokrenite računalo da biste se sada pokrenuli u sigurnom načinu.
- U sigurnom načinu rada provjerite hoće li se programska traka zamrznuti nakon nekog vremena ili čak pri pokretanju.
- Ako se programska traka ne zamrzne u ovom načinu rada, to znači da je problem ili problem izazvala aplikacija ili usluga treće strane.
- Počnite omogućavati aplikacije jednu po jednu i provjerite zbog koje se poteškoće vraćaju.
- Ako su sve aplikacije u redu, počnite omogućavati usluge jednu po jednu i provjerite zbog koje se poteškoće vraćaju.
- Neka problematična usluga / aplikacija bude onemogućena ili je pokušajte ponovo instalirati / ažurirati.


10. metoda: Izvođenje obnavljanja sustava
Neki su korisnici otkrili da je jednostavnim vraćanjem na raniji radni datum riješen njihov problem, ali morat ćete pažljivo odabrati točku vraćanja na koju ćete vraćati. Preporučuje se da ručno prođete kroz ovaj postupak umjesto da koristite automatsko vraćanje. Da biste izveli ovaj korak, slijedite donji vodič.
- Pritisnite "Windows" + "R" da biste otvorili upit za pokretanje.
- Upišite "rstrui" i pritisnite "Enter" da biste otvorili prozor za upravljanje vraćanjem.
- Kliknite "Dalje" i označite opciju "Prikaži više bodova za vraćanje" .
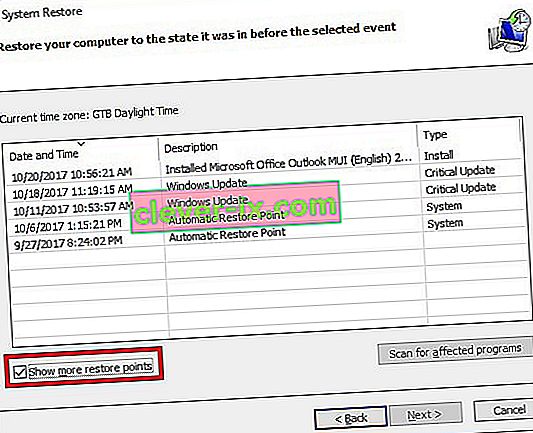
- Odaberite točku vraćanja na popisu stariju od datuma kada se ovaj problem počeo pojavljivati na vašem računalu.
- Ponovno kliknite "Dalje" i slijedite upute na zaslonu da biste vratili sve natrag na datum koji ste odabrali iz prozora za vraćanje.
- Provjerite rješava li time problem smrznute programske trake.


11. metoda: Uključivanje / isključivanje sistemskih ikona
U nekim je slučajevima moguće da se postavka ikone sustava pokvari na vašem računalu zbog čega se ovaj problem pokreće. Stoga ćemo u ovom koraku prebacivati ove ikone, a zatim ćemo provjeriti rješava li to problem. Za to:
- Pritisnite "Windows" + "I" da biste otvorili postavke i kliknite opciju "Personalizacija" .
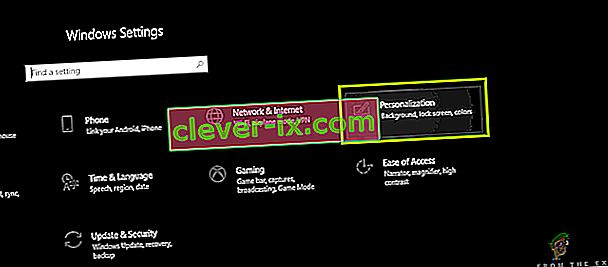
- S lijeve strane kliknite gumb "Traka zadataka" .
- Pod naslovom "Područje obavijesti" kliknite gumb "Uključivanje ili isključivanje ikona sustava" .

- Sve ikone u sljedećem prozoru prebacite jednu po jednu tako što ćete ih isključiti na nekoliko sekundi, a zatim ih ponovno uključiti.
- Nakon završetka ovog postupka, vratite se na radnu površinu zatvarajući ovaj prozor.
- Provjerite je li to riješilo problem.


12. način: Pokrenite alat za rješavanje problema s održavanjem sustava Windows
Moguće je da na vašem računalu postoje neke zaostale datoteke zbog kojih nedostaje memorije straničenja sustava ili ako postoje preostali prečaci određenih aplikacija, što također može spriječiti pravilno funkcioniranje programske trake. Stoga ćemo u ovom koraku pokrenuti alat za rješavanje problema s održavanjem sustava Windows, a zatim provjeriti rješava li ovaj problem taj problem. Za to:
- Press “Windows’ + “R” to open the Run prompt.
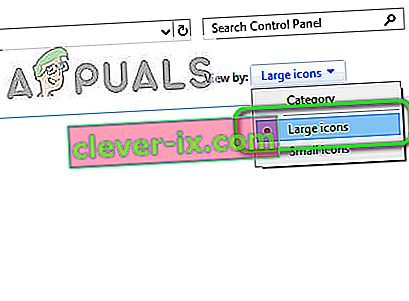
- Type in “Control Panel” and press “Enter” to launch the classical control panel interface.

- Click on the “View By:” option from the top and select the “Large Icons” option from the menu.
- In the next window, click on the “Troubleshooting” option and then click on the “Run Maintenance Tasks” button.
- In the window that pops up, click on the Next button, and provide administrative privileges to successfully run this task.
- Wait for the Maintenance to be completed and check to see if doing so has fixed the issue with the frozen taskbar.


Method 13: Use DDU to Perform a Clean Install
In some cases, it is possible that the Graphics Card installed on the system might have a faulty driver installed due to which this issue is being triggered. Therefore, in this step, we will be performing a Clean install of the Graphics Driver by uninstalling the Driver using DDU and then we will check to see if doing so has fixed the issue with the Taskbar. For that:
- Make sure to back up any important data before performing this step in case something goes unexpected.
- Download the DDU software from this website.
- After downloading the software, extract the zip file and open the folder where it has been extracted.
- Run the “.exe” file inside the folder and it will automatically further extract inside the same folder.
- Open the newly extracted folder and click on the “Display Driver Uninstaller.exe”.
- Click on the “Select Device Type” dropdown and select “GPU”.
- In the other dropdown, select the manufacturer of your GPU and then click on the “Clean and do not Restart” option.
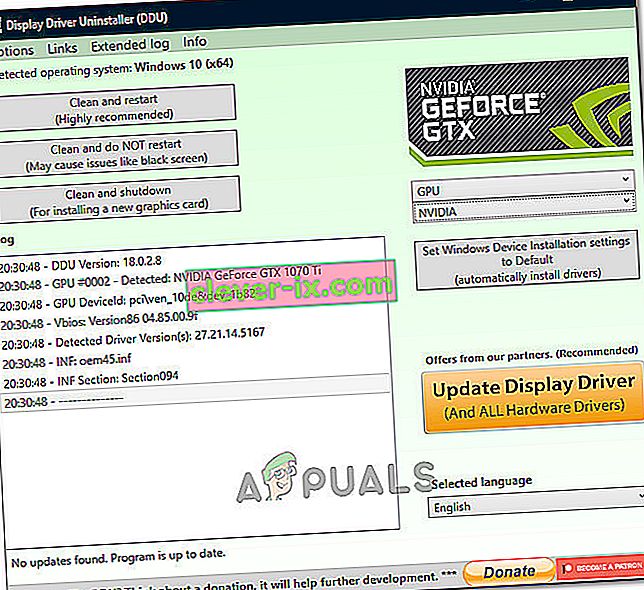
- This will uninstall the device driver for your GPU and it should automatically shift to the Microsoft Basic Visual Adapter.
- After uninstalling this software, download the GPU driver from your manufacturer’s website by specifying your exact make and model.
- Install this software on your computer and then check to see if doing so fixes the taskbar freezing issue on your computer.

Method 14: Stopping Windows Service
In some situations, it is possible that a certain Windows service might need to be stopped from the task manager. Therefore, in this step, we will be preventing it from running in the background as it has likely hanged due to which the taskbar is being frozen. In order to stop this service:
- Press “Windows’ + “R” to open the Run prompt.
- Type in “taskmgr” and press “Enter” to open the Task Manager.
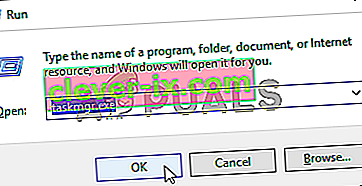
- Click on the “Processes” tab and from the list, click on the “Service Host: DCOM Server Process Launcher” service.
- Click on the “End Task” button and close out of the task manager.
- After closing out of the task manager, check to see if doing so has fixed the frozen taskbar situation.

Method 15: Stop Microsoft Edge and Remove it from Taskbar
In some situations, the default browser that comes installed with Microsoft Windows might just be the culprit behind this whole issue. If you are using another browser as your go-to default browser, you might see that using the Microsoft Edge browser causes issues with the taskbar. Therefore, in this step, we will be stopping Microsoft Edge from the Task Manager and then we will remove it from the taskbar. For that:
- Press “Windows’ + “R” to lauch the Run prompt.
- Type in “taskmgr” and press “Enter” to open the Task Manager.
- Click on the “Processes” tab and from the list, click on the “Microsoft Edge” browser.
- Click on the “End Task” button and close the task manager.
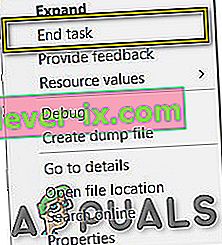
- If the Taskbar is still frozen, restart your computer and repeat this process.
- After doing so, right-click on the Microsoft Edge icon in the taskbar.
- Select the “Unpin from Taskbar” option to remove Microsoft Edge from your taskbar.
- Check to see if doing so fixes the issue.

Method 16: Remove Outdated References
It is possible that your Registry might be plagued with outdated references to an old operating system that you might’ve upgraded from. Even if you have removed the Windows.old folder from your computer, some driver and registry files might still be associated with the “Windows.old” folder which practically doesn’t exist on your computer and this misconfiguration might prevent your computer from working properly. Therefore, in this step, we will be removing it from the registry editor. For that:
- Press “Windows’ + “R’ to open the Run prompt.
- Type in “regedit” and press “Enter” to open the registry editor.
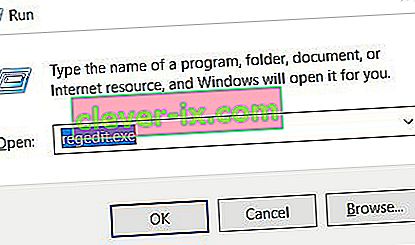
- Press “Ctrl” + “F” to open the finder and type in the “c:\windows.old” line and press “Enter” to find any registry related entries.
- Delete or remove any such entries that refer to this and run an SFC scan to check for any missing files.
- Make sure to install any missing drivers using Driver Easy and then check to see if the Frozen Taskbar issue has been fixed.

Method 17: Rollback Updates
In some situations, Windows might’ve acquired some updates that are preventing your computer from functioning properly and due to this, the taskbar feature has been broken. Therefore, in this step, we will be rolling back some recently installed updates and then we will check to see if doing so fixes the frozen taskbar issue. In order to do that:
- Press “Windows’ + “I” buttons on your keyboard to open the Windows settings.
- In the Windows Settings, click on the “Update and Security” button and from the left pane, select “Windows Update”.
- On the next screen, select the “Update History” button and it should lead to a new window.
- In the new window, there should be an “Uninstall Updates” button and by clicking on it, a prompt should open that should enable you to be able to uninstall an update.
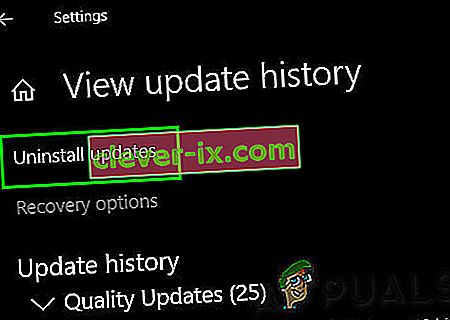
- Follow the on-screen instructions to be able to fully remove the update and check to see if the issue persists after doing so.


Method 18: Signing out of Account
It is possible that the Windows Taskbar is getting frozen due to a glitch during the account login. Therefore, we can test this out by simply signing out of our account and then signing back in to ensure that the account is logged in properly and that it is properly registered with the Microsoft Servers. In order to do so:
- Press “Ctrl” + “Alt” + “Del” buttons on your keyboard to open up the account options.
- Click on the “Sign out” option from the screen to log out of your account.
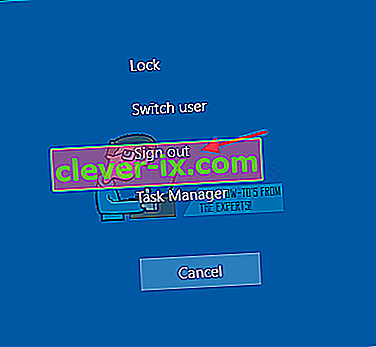
- Wait for Windows to completely sign you out of your account and confirm any prompts on your screen to complete the sign-out process.
- Select your account and sign back into your account from the next screen by entering your login details.
- Check to see if doing so has fixed the frozen taskbar issue on your account.

Method 19: Creating Batch File
Most people found that restarting the Windows Explorer fixed their issue but for some of them, it kept coming back after a while. Therefore, in this step, we figured out a way for the people that can solve it by restarting but all they will have to do is click on a batch file present on their desktops. For that:
- Right-click anywhere on your desktop and select the “New>” option.
- Click on the “Text Document” option and a new text document will be created on your desktop.
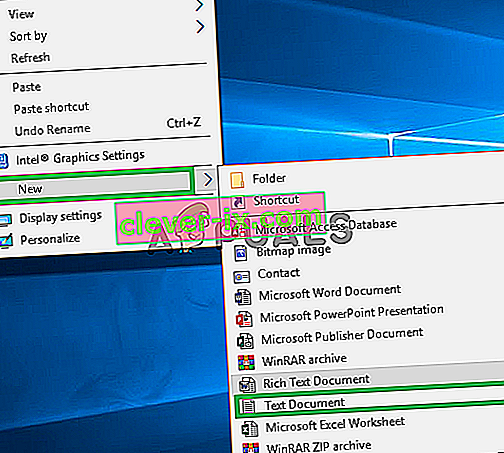
- Open this text document and paste the following lines inside of the text document.
taskkill /f /IM explorer.exe start explorer.exe exit
- Click on the “File” option at the top left of the window and select the “Save As” option.
- Enter the “TaskMRestart.bat” as the file name and select “All Files” from the “File Type” dropdown.
- Save this file on your desktop and exit out of the document.
- Now, double-clicking on this newly saved file should automatically restart File Explorer which should fix the Frozen taskbar issue within a second.
- You can just click on the file whenever the taskbar freezes and it should fix itself.

Method 20: Perform an Update
The frozen taskbar issue was a very famous topic on most Microsoft forums and apparently a lot of Microsoft officials took note of it. Therefore, it is possible that this issue might’ve been fixed for some people in recent updates released by Microsoft. Therefore, in this step, we will be checking for any available updates from Microsoft and installing them on our devices. For that:
- Press “Windows” + “I” to open the settings.
- In the settings, click on the “Update and Security” option and then select the “WindowsUpdate” button from the left side.
- In the Windows Update, click on the “Check for Updates” button and a prompt will be registered that will automatically check for any newly available updates.
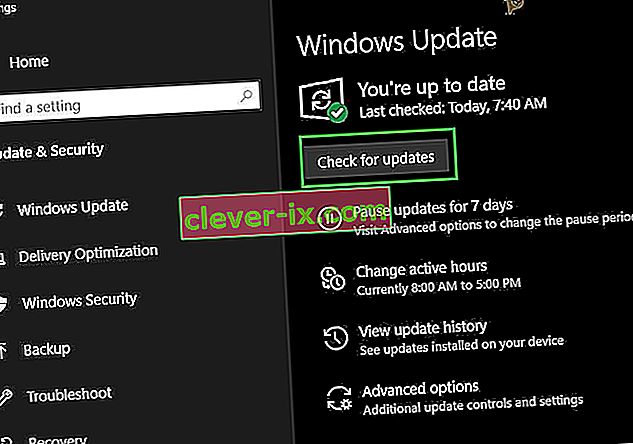
- Install these updates on your computer by following the on-screen instructions and restart your computer.
- Check to see if installing these updates fixes the issue on your computer.

Method 21: Unpinning Items from Start Menu
Some people like to pin important items to the start menu for ease of access and increased productivity. However, as it stands, some Windows users have been facing the frozen taskbar issue due to these pinned items. Therefore, in this step, we will be unpinning some items from the start menu and the taskbar and then we will check to see if doing so fixes the frozen taskbar bug.
- Press the “Windows” button on your keyboard to launch the start menu.
- Inside the start menu, right-click on a tile on the right side of the start menu.
- Select the “Unpin from Start Menu” button to remove the item from the Start menu tiles.
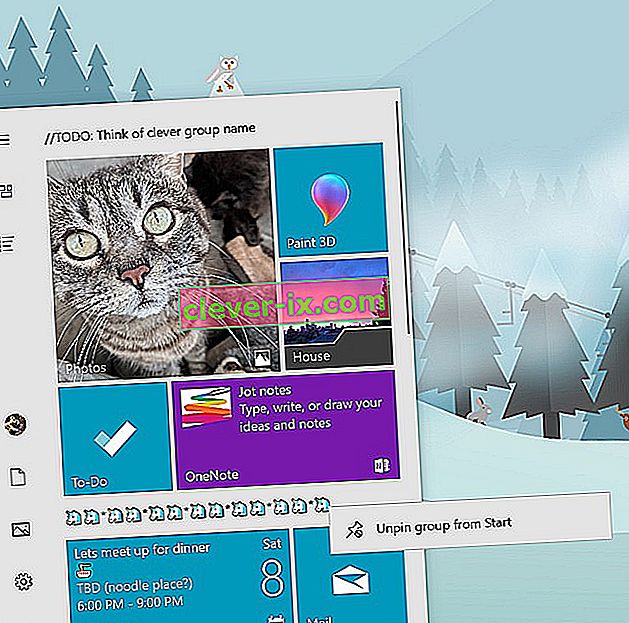
- After removing some items, check to see if the bug is fixed.
- Try removing all the items that can be removed if the bug comes back and check again.
- For a more accurate removal, try removing all the programs from the taskbar and the Start menu that try to connect to the internet, for example, Microsoft Edge, Cortana, News, etc.

Method 22: Disable Items from Bios
It is possible in some cases that the computer’s Bios has been improperly configured due to which the Windows Taskbar is getting frozen time and time again. Therefore, in this step, we will first be booting inside the Bios from which we will disable an option that should get rid of this problem if it was based around the Bios. In order to do so:
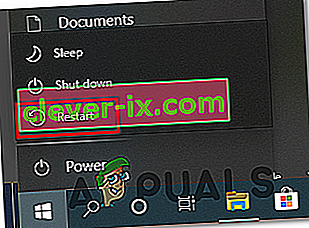
- Pritisnite tipku "Windows" na tipkovnici i kliknite ikonu "Gumb za uključivanje" .
- S popisa odaberite opciju "Restart" i pričekajte da računalo zatraži ponovno pokretanje.
- Kad se računalo isključi i počne se podizati, počnite pritiskati tipku "Del", "F12" ili "F11", ovisno o vašoj matičnoj ploči za pokretanje unutar bios računala.
- Iz biografije krećite se kroz različite postavke dok ne pronađete značajku "iGPU Multi-Monitor" .
- Onemogućite ovu značajku unutar Biosa i vratite se u sustav Windows.
- Provjerite funkcionira li onemogućavanje ove značajke i ispravite pogrešku smrznute programske trake.


