0xc000000e pogreška prilikom pokušaja da se pokrene windows znači da ste se bave oštećene boot konfiguracija podataka. Podaci o konfiguraciji pokretanja globalna su trgovina za sve opcije i postavke povezane s pokretanjem sustava na novijim Windows računalima.
Ovu ćete pogrešku dobiti prilikom pokušaja pokretanja uređaja i prikazat će se crni zaslon s uputama za popravak računala pomoću instalacijskog diska ili pogona za oporavak. Nažalost, jedini pogon za rješavanje ovog problema jest posjedovanje tog pogona za oporavak, pa biste ga trebali primiti prije početka. Ako ga nemate, prilično je jednostavno stvoriti ga pomoću alata Rufus ili Windows Media Creation s bilo kojeg drugog računala ili prijenosnog računala.

Također ćete se trebati pokrenuti u BIOS-u da biste promijenili redoslijed pokretanja i pokrenuli računalo s pogona za oporavak umjesto s tvrdog diska. Da biste to učinili, slijedite sljedeće korake:
- Unesite postavke BIOS-a ili UEFI pritiskom na tipku označenu od proizvođača matične ploče prije pokretanja sustava Windows. Ta je tipka obično Esc, Delete, F2, F8, F10, F12 ili Backspace, ovisno o proizvođaču. Možete izvršiti internetsku pretragu kako ući u BIOS, nakon čega slijedi model vašeg računala.
- Kad uđete unutra, prijeđite na Dizanje sustava Pomoću uputa u BIOS-u promijenite redoslijed pokretanja i postavite CD-ROM ili USB priključak kao prvi uređaj, ovisno o tome je li vaš pogon za oporavak CD ili bljeskalica .
- Spremite postavke i izađite.

Metoda 1: Obnovite podatke o konfiguraciji pokretanja
Da biste to učinili, morat ćete pokrenuti računalo s pogona za oporavak. Ako ste konfigurirali BIOS pomoću gornjih koraka, to možete učiniti pritiskom bilo koje tipke kada se na vašem zaslonu pojavi upit. Nakon što se računalo pokrene s pogona za oporavak, slijedite sljedeće korake za ponovnu izgradnju BCD-a:
- U dijaloškom okviru Windows Setup postavite sve na odgovarajuće vrijednosti, odaberite svoj jezik i kliknite
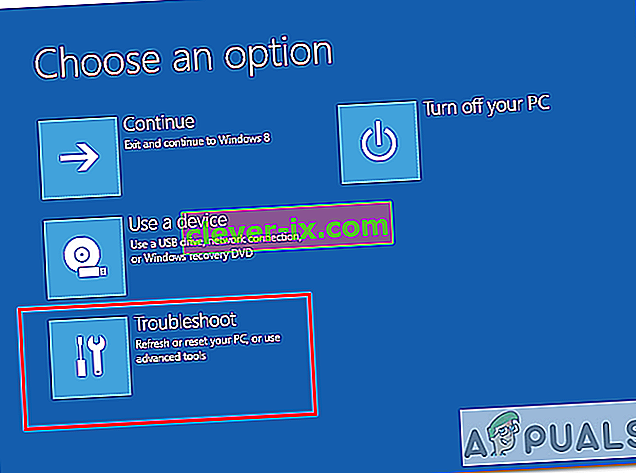
- U donjem lijevom kutu kliknite Popravak računala i odaberite Rješavanje problema na zaslonu Odaberite opciju.
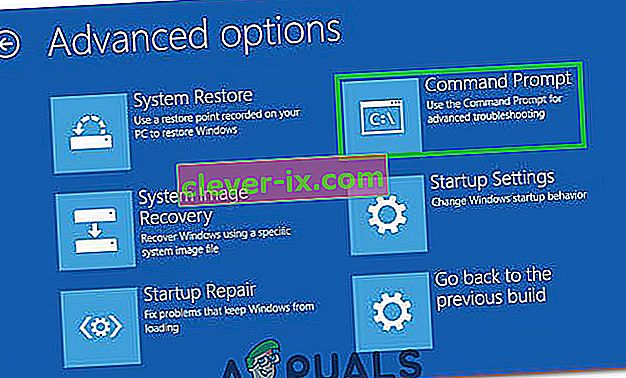
- Na zaslonu za rješavanje problema kliknite Napredne mogućnosti i kliknite Naredbeni redak.
- Kad se otvori naredbeni redak, upišite sljedeće naredbe i nakon svake od njih pritisnite tipku Enter :
bootrec / scanos bootrec / fixmbr bootrec / fixboot bootrec / rebuildbcd
- Ponovo pokrenite računalo i trebalo bi se pokrenuti sasvim dobro, bez ponovnog suočavanja s problemom.

2. metoda: Popravite svoj OS pogonom za oporavak
Ova metoda također će popraviti vaš OS pomoću naredbenog retka pogona za oporavak i trebali biste se moći pokrenuti u sustavu Windows bez ponovnog suočavanja s problemom. Podignite sustav s pogona za oporavak i slijedite upute u nastavku.
- Koristite korake od 1 do 3 iz prethodne metode da biste došli do naredbenog retka pogona za oporavak.
- Kad uđete u naredbeni redak, upišite naredbe dolje, a zatim tipku Enter na tipkovnici da biste ih izvršili. StartRep.exe program ispravlja vrijednosti boot sustava i treba popraviti pogrešku BCD. Imajte na umu da ćete možda morati ponoviti ovaj korak više puta u slučaju da ne uspije.
cd x: \ sources \ recovery StartRep.exe
- Ako prethodni korak popravljanja sustava Windows nije pomogao, upišite bcdedit u naredbeni redak da biste vidjeli vrijednosti za Windows Boot Manager.
- Zabilježite vrijednosti uređaja . Ako su nepoznate , upišite sljedeće naredbe, nakon kojih slijedi Enter da biste ih izvršili. Ako je potrebno, trebali biste zamijeniti C: particijom na kojoj je instaliran vaš operativni sustav.
bcdedit / set {DEFAULT.EN_US} particija uređaja = c: bcdedit / set {DEFAULT.EN_US} osdevice particija = c: bcdedit / set {BOOTMGR.EN_US} particija uređaja = c:- Kad je naredbeni redak gotov, zatvorite ga, uklonite pogon za oporavak i ponovno pokrenite sustav. Ne bi trebalo imati problema s podizanjem sustava sada.
Jedini nedostatak ovih rješenja je taj što zahtijevaju pogon za oporavak, strpljenje i jake živce. Međutim, ako ih slijedite kako su opisani, trebali biste ispraviti grešku koju ste dobili i nastaviti koristiti uređaj kao i prije.
3. metoda: Omogućite Windows 10 WHQL podršku u BIOS-u
Postavka Windows 10 WHQL podrške postoji u nekim OEM-ima. Ima dvije osnovne funkcije: provjerava potpisane upravljačke programe tijekom postupka pokretanja i omogućuje vam omogućavanje UEFI podrške. Ako koristite Windows 10, morate ga omogućiti i tada se računalo može normalno pokrenuti. Međutim, ako nije odabrana, vaše se računalo može pokrenuti s pogreškom 0xc000000e. Dakle, možete pristupiti BIOS-u da biste vidjeli je li omogućena postavka Windows 10 WHQL podrške. Ako nije, omogućite mu isprobavanje.
Imajte na umu da postavka podrške za Windows 10 WHQL nije podržana na svim računalima. Ako ga vaše računalo nema, možete provjeriti je li na vašem računalu omogućena UEFI podrška. Ako nije, možete ga omogućiti da biste vidjeli nestaje li kôd pogreške 0xc000000e. Da biste je omogućili:
- U potpunosti isključite računalo i pustite ga da odstoji barem nekoliko minuta.
- Nakon što provjerite je li prošlo dovoljno vremena, pokrenite računalo i napravite sigurnosnu kopiju i primijetili biste opciju " Pritisnite ovaj gumb za pokretanje u način rada Bios ".
- Pritisnite gumb za pokretanje u Bios modu.
- Nakon uspješnog pokretanja unutar načina Bios, provjerite postoji li postavka Windows WHQL u Biosu.
- Ako je prisutan, pritisnite "Enter" da biste ga odabrali nakon što ste ga istaknuli pomoću tipki sa strelicama, a zatim odaberite opciju "Omogućeno" da biste ga omogućili na računalu.

- Provjerite rješava li ovo problem.

Ako se pogreška pokretanja sustava Windows 10 0xc000000e i dalje pojavljuje nakon omogućavanja postavke WHQL podrške za Windows 10 ili podrške UEFI, možda ćete trebati resetirati BIOS / UEFI konfiguraciju na računalu.
Metoda 4: Obnovite BCD pomoću Easy Recovery Essentials
Easy Recovery Essentials značajka je automatskog popravka sustava jednim klikom koja uključuje potpuno popravak i rekonstrukciju BCD-a kako bi se riješila pogreška "0xc000000e", čak i u slučajevima kada se Windows neće pokrenuti kao rezultat pogreške.
Komponenta automatiziranog popravljanja pokretanja sustava EasyRE riješit će sve probleme povezane s BCD-om, popraviti BCD ili ga ponovno stvoriti ispočetka koristeći ispravno kodiranje i put za particiju koja se odbija pravilno učitati. Također će označiti disk kao mrežni kako bi se osiguralo da ispravno radi.
Easy Recovery Essentials zajamčeno je da će automatski popraviti pogrešku "0xc000000e" pomoću svoje ugrađene opcije automatskog popravka. EasyRE je trenutno dostupan za Windows XP, Vista, 7, 8, 10 i može se preuzeti i stvoriti na bilo kojem računalu.
- Upoznajte drugo računalo koje biste mogli koristiti za stvaranje USB-a koji ćemo koristiti za pokretanje računala.
- Preuzmite Easy Recovery Essentials odavde.

- Spali sliku.
- Podignite računalo s CD-a Easy Recovery Essentials ili USB-a koji ste stvorili.
- Kada se EasyRE pokrene, odaberite opciju "Automated Repair" i pritisnite Continue.
- Nakon što EasyRE skenira pogone računala, s popisa identificirajte i odaberite slovo pogona za instalaciju sustava Windows, a zatim kliknite opciju Automatiziranog popravka za početak.
- Easy Recovery Essentials počet će analizirati odabrani pogon na probleme. EasyRE će testirati i pokušati automatski ispraviti pogreške na disku, particiji, bootsektoru, datotečnom sustavu, bootloaderu i registru. Nije potrebna intervencija, jer je popravak EasyRE-a u potpunosti automatiziran.
- Nakon završetka postupka, EasyRE će izvijestiti o svojim nalazima. Kliknite gumb Restart da biste ponovno pokrenuli računalo i testirali promjene.

5. metoda: Resetiranje BIOS / UEFI konfiguracije
Neki su korisnici rekli da se njihova pogreška 0xc000000e rješava resetiranjem BIOS / UEFI konfiguracije. Dakle, možete razmisliti o pokušaju ove metode kako biste vidjeli može li se problem riješiti.
Korak 1. Otvorite BIOS izbornik
Da biste BIOS vratili na zadane postavke, prvo morate pristupiti izborniku BIOS-a i pronaći opciju Zadane postavke.
Korisnici sustava Windows 10 mogu pristupiti naprednim mogućnostima pokretanja sustava Windows 10 i ući u izbornik BIOS-a. Možete kliknuti Start -> Power, pritisnuti i držati tipku Shift, a zatim kliknuti gumb Restart da biste ponovno pokrenuli Windows u Windows Recovery Environment. Zatim kliknite Rješavanje problema -> Napredne mogućnosti -> UEFI postavke firmvera, a zatim kliknite Restart (Ponovno pokretanje) da biste otvorili zaslon BIOS postavki.
Alternatively, you can also restart your computer normally and press the required key in the startup screen to boot into the BIOS settings window. The hotkey is varied from different computer manufacturers, and it could be F12, Del, Esc, F8, F2, etc.
Step 2. Find the Setup Defaults Option
The name and location of the “Setup Defaults” option may be different from various computers. It generally calls like: Load Default, Load Setup Defaults, Load Default Settings, Load BIOS Defaults, Load Optimal Defaults, etc.
Use the arrow keys on the computer keyboard to find the BIOS setup default option in the BIOS settings screen. You may find it in one of the BIOS tabs.
Step 3. Reset BIOS
After you find the Load Setup Defaults option, you can select it and press the Enter button to start resetting the BIOS to factory default settings in Windows 10.
At last, you can press F10 to save and exit BIOS. Your computer will automatically reboot. If you need to change BIOS settings again in the future, you can follow the same instructions to access BIOS again to change it.
Method 6: Mark Boot Disk As Online
It is possible in some cases, that the disk that you have connected to the computer or the USB that you are trying to boot from has been marked as offline by the computer. Some computers tend to prevent extra applications, hardware, and other things from being able to run as soon as the computer starts because it allows for more convenient and fast startup experience. Therefore, in this step, we will be marking the Disk as online.
You still need to use a bootable USB medium to do this job. We will show you a step-by-step guide here:
- After booting your computer from the bootable USB drive, you need to go to Next > Repair your computer. Then, you will enter WinRE.
- Go to Troubleshoot > Advanced options > Command Prompt.
- Make sure to properly enter your login credentials if you are asked by the computer.
- Type in the following command inside the command prompt to successfully launch the disk part utility on your computer.
diskpart
- Type in either one of the following commands in the next window to list the currently connected disk drives to your computer.
List Disk List Volume
- Once the disks have been listed, you need to identify the disk that contains the Windows operating system and the one that you want to mark as active.
- After identifying it, select the disk using the following command and replacing the alphabet with the driver letter of that disk.
select disk A Select Volume A (Replace A with the Drive Letter)
- After you have successfully selected the disk, you must mark the disk as online in order to initiate the recognization process of the disk at startup. Use the following commands to do that.
Online Disk Online Volume
- Type in the following command to successfully get out of the command prompt and restart your computer after that.
Exit
- Check to see if marking the Disk as online has fixed your issue.

Method 7: Check your data cables, BIOS and drivers
Unplug all HDD data cables, and then plug them again. Revert to the previous drivers and BIOS settings if they were changed, or use “Restore factory settings” option in the BIOS. Make sure to write down all current BIOS settings that were previously selected, just in case it is required to switch back. If the error is caused by a change of the SATA disk controller’s mode in the BIOS or firmware, the fix can be as simple as entering the BIOS and toggling the SATA controller’s “mode” setting. The exact instructions differ from one manufacturer to the other, but the options will resemble what is shown in the screenshots below.
To check the boot order, follow these steps:
- Restart the computer
- Press the necessary key to open the BIOS menu. This key depends on the computer manufacturer and computer model. This is usually listed on the first screen that appears on the monitor. It can be any of the following: Esc, Del, F2, F8, F10 or F12.
- If the screen shows multiple keys, find the key to open “BIOS”, “setup” or “BIOS menu”
- Attempt to toggle between all three (or more) modes until a combination that results in Windows booting successfully once more is found.
Method 8: Boot Windows In Safe Mode
If above solutions didn’t fix the problem, then Start Windows into safe mode. This will start your PC with minimum system requirements, will not load startup programs, add-ons etc. And allow performing troubleshooting steps to fix Boot Error 0xc000000e:
Before you enter the safe mode, you need to enter the Windows Recovery Environment (winRE). To do this, you will repeatedly turn your device OFF, then ON:
- Hold down the power button for 10 seconds to turn off your device.
- Press the power button again to turn on your device.
- On the first sign that Windows has started (for example, some devices show the manufacturer’s logo when restarting) hold down the power button for 10 seconds to turn off your device.
- Press the power button again to turn on your device.
- When Windows restarts, hold down the power button for 10 seconds to turn off your device.
- Press the power button again to turn on your device.
- Allow your device to fully restart and you should boot into the Windows Recovery Environment.
Now that you are in the Windows Recovery Environment, you will follow these steps to take you to safe mode:
- On the Choose an option, screen, select “Troubleshoot” and then “Advanced options.”
- Now click on “Startup Settings” and click on “Restart.”
- After your device restarts, you’ll see a list of options. Select option “4” from the list or press “F4” to enter Safe Mode.

Note: If you need to exit safe mode, simply restart your device, or:
- Press the “Windows logo key + R.”
- Type “msconfig” in the Run box and then select “OK”.

- Select the Boot tab and under Boot options, clear the Safe boot checkbox.

Method 9: Check your disk with CHKDSK utility
If the hard drive has its file integrity compromised, it is possible to use built-in Windows CHKDSK utility to scan the disk and fix the file system errors.
- Connect a USB drive that has been made bootable or insert the Windows Installation Disk on your computer.
- After connecting one of these, boot from that connected device.
- After booting your computer from the device, click on “Next” and then on the “Repair your Computer” option.
- On the next window, click on “Troubleshoot” and then on the “Advanced” Option.

- On the next screen, make sure to select the “CommandPrompt” option to successfully launch into the command prompt.
- Provide the login credentials of your account in order to boot inside the cmd.
- Inside the command prompt, type in the following command to successfully run the check disk utility on your computer.
chkdsk C: /f (Make sure to replace the "C" with the Drive letter of your partition).
- Confirm any on-screen prompts and wait for the scan to be fully completed.
- Check to see if the issue is fixed by performing this step.
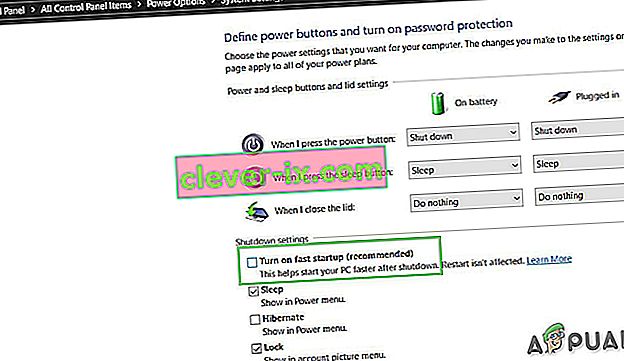
Method 10: Disable fast startup Feature
If your computer has been set up to use the Fast Startup feature, you might be getting this error message on your screen because of doing so. The Fast Startup feature is known to malfunction with some operating systems and hardware combinations.
Basically, when enabled, the feature automatically sends some launch configurations to be stored in your RAM to allow for a faster startup as indicated by its name but this configuration data can sometimes be corrupted which can lead to this error on your computer. Therefore, in this step, we will be disabling it completely. For that:
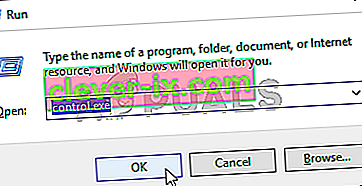
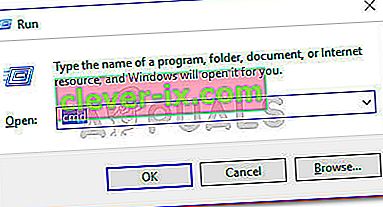
- Press “Windows” + “R” to open the Run prompt.
- Type in “Control Panel” and press “enter” to launch the classical Control Panel interface.
- Inside the control panel, click on the “Hardware and Sound” option and then select the “Power Options” button.

- Inside the power options, click on the “Choose what the power button does” from the left side.
- Click on the “Change Settings” option if the fast startup option is greyed out.
- Make sure to uncheck the “Turn on Fast Startup” option and save your changes.
- Closeout of the window and terminate any unnecessary applications.
- Click on the “Start Menu”, click on the “Power Options” and select “Shutdown” from the list.
- This option should completely power down your computer and after performing a complete shutdown, wait for some minutes before turning your computer back on.
- After the computer turns back on, check to see if the error message is fixed.
Note: This solution can only be applied if you are able to sometimes boot up your computer normally and are only encountering this error momentarily.


Method 11: Repair Corrupted System Files
It also possible in some situations that certain system files might have been corrupted due to a storage failure or due to some other reason. Therefore, in this step, we will be performing a complete repair of the corrupted system files and then we will check to see if doing so fixes this issue. For that:
- Press “Windows” + “R” to open the Run prompt.
- Type in “cmd” and then press “Shift” + “Ctrl” + “Enter” to launch the command prompt with admin privileges.
- Type in the following commands one by one and press “Enter” after each to successfully run an SFC scan and a DISM Scan on your computer.
DISM /Online /Cleanup-Image /RestoreHealth sfc /scannow
- Restart your computer completely once these scans are completed.
- Check to see if by performing these scans, you were able to fix this issue on your computer.

Method 12: Run Windows Startup Repair
Startup Repair is capable of diagnosing and fixing the found issues. For example, it can automatically scan system files, registry settings, configuration settings, etc. and try to fix the problem on its own. Startup Repair is especially useful when your computer is unbootable. Since your computer fails to boot, Windows can boot into WinRE automatically. While, if it doesn’t appear, you can interrupt the boot process three times in a row, and then the WinRE screen appears. Alternatively, if you have a bootable USB medium, you can also set your computer to boot from it and go to Repair your computer to enter WinRE.
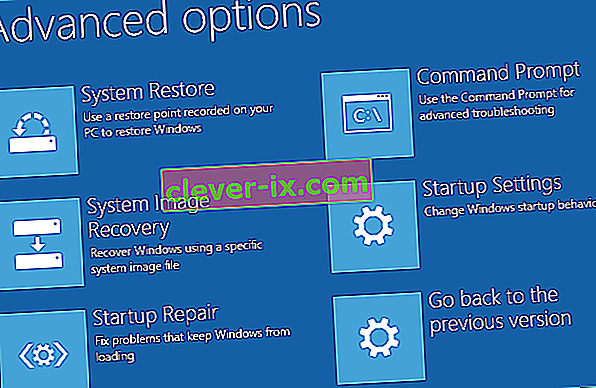
After you have successfully booted into the Windows Recovery Environment, click on the “Troubleshoot” option, and from there, select the “Advanced Options” screen. Inside the advanced options, select the “StartupRepair” button to successfully initiate the Startup Repairing process. Windows will begin to diagnose your computer automatically. When the process ends, your computer will restart automatically. You can wait to see whether it can boot successfully.

Zaobilazno rješenje: provjerite jesu li priključeni dodatni uređaji prije ulaska u naredbeni redak ili Popravak pri pokretanju, najbolje je pokušati ponovno pokrenuti uređaj s najmanjim brojem uređaja i vanjskih pogona priključenih na računalo. To će osigurati da ništa što je nedavno dodano na računalo ne uzrokuje ovaj problem. Bilo bi najbolje isključiti sve nedavne USB pogone, CD-ove, DVD-ove itd. To uključuje i čitač memorijske kartice. Provjerite jesu li isključeni svi vanjski pogoni i USB ključevi ili USB skočni pogoni, a zatim pokušajte ponovo.


